
Nothing fancy but very helpful. So once you have it looking the way you want and have saved your .bgi file, copy it and the .exe file to your SYSVOL (or other shared location). I use SYSVOL because it is shared to all user and computer accounts by default and works very well for this application.
If you don't know the location of the SYSVOL you can find it locally on your Domain Controller at C:\Windows\SYSVOL\domain\scripts or at \\domain.TLD\sysvol\domain.TLD\scripts\ if you are working remotely.
I created a new folder called BGInfo and copied the files there.
Now we need to open Group Policy Manager and create a new GPO called BGInfo. Edit that file and go to Computer Configuration > Preferences > Windows Settings
First we need to create the new folder which we will copy the files to. Right Click on Folders and Select New > Folder

Set Action to Update and Path to C:\BGInfo Click OK
 \
\
Now Right Click on Files and Select New > File

In Action Select Update. For Source file use the URL path to your .exe file. In Destination file use C:\BGInfo\file.exe

So Source file(you will need to change the path):
\\lab.com\sysvol\lab.com\scripts\BGInfo\file.exe
\\lab.com\sysvol\lab.com\scripts\BGInfo\file.exe
Destination: C:\BGInfo\file.exe
Repeat this step for the .bgi file and you should have something similar to the following
5/22/17 Update - After a good deal of testing in my lab I have determined that because GPP does not update in the same manner as GPO, that you will have issues if you ever try and update the .bgi file with any changes. It will not update those changes on the local machines the way you would expect it to. As a result I added another step in the file copy process. First step is to copy the .exe. Second step is to delete the .bgi file on the local computer. Third step is to download the new file. This will help to distribute changes as they occur.

Final step is to create a shortcut to run the file when a user logs onto the system. Right Click on Shortcuts > New > Shortcut. Set Action to Update, Name it BGInfo, Target Type is File System Object and Location is All Users StartUp.
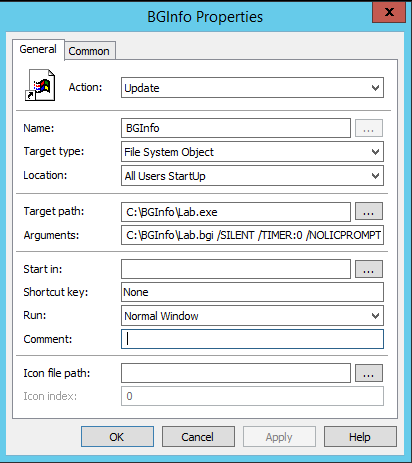
Target path: C:\BGInfo\file.exe
Arguments: C:\BGInfo\file.bgi /SILENT /TIMER:0 /NOLICPROMPT
You want to make sure you pass the arguments along so end users are not constantly prompted when they log in.
Finally you need to apply the GPO to a test OU and run it on a test machine by doing a gpupdate /force.
The files will download and you can validate that by checking for C:\BGInfo and the .exe and .bgi files. In order for it to work you will need to log out and log back in. It takes a second but it should refresh the desktop with the new image.
More to come!
If you like this blog, give it a g+1
More to come!
If you like this blog, give it a g+1
No comments:
Post a Comment